I want ChatGPT to write in my exact style.
The content you get from ChatGPT sounds dull and robotic. Editing AI content in your voice is tedious.
OpenAI Fine-Tuning
It's possible to fine-tune ChatGPT on your own data, so that it can write AI content that sounds like you...More


We need to make sure this project is done right. This technique is going to be used to write in my exact style, so getting the right results is essential. We need to collect the samples, get the data in the right format, and train the model. Once we have the results, we'll need to do some manual blind testing to make sure everything is as it should be. Let's get this project moving!
This course is a work of fiction. Unless otherwise indicated, all the names, characters, businesses, data, places, events and incidents in this course are either the product of the author's imagination or used in a fictitious manner. Any resemblance to actual persons, living or dead, or actual events is purely coincidental.
OpenAI recently launched a new feature for their 3.5 model called fine-tuning. This feature allows users to customize their AI models to make them better suited to specific tasks. It is an important and useful development in the realm of AI and machine learning. At its core, fine-tuning involves getting data into the correct format, uploading it to OpenAI, and then training the model on the data. The process can be complicated, but it is not as difficult as it may seem. The first step is to get the data into the correct format. This typically involves converting the data into a JSONL format, where each object is on its own line. Once the data is prepared, it is then uploaded to OpenAI and the model is trained on the data. The benefit of fine-tuning is that the model can be tailored to specific tasks. For example, if you want to train the model to respond to a certain prompt, you can do so by providing examples of that prompt in the data. This allows the model to learn how to respond to a prompt more accurately. Additionally, the model can be fine-tuned to recognize and respond to certain language styles, such as informal language or more technical language. It is important to note that for fine-tuning to be effective, there needs to be a sufficient amount of data to work with. OpenAI recommends at least 50 observations, but it is generally accepted that 200 observations are needed to get the best results. If you don't have enough data, you can either use prompt engineering or try to generate more data manually. The cost of fine-tuning is also something to consider. OpenAI charges 8 cents per 1000 tokens to train the model, and 1 cent per input and 1.5 cents per output when talking to the model. This is significantly cheaper than GPT-3, which typically charges 3-6 cents per token. As such, fine-tuning is a more cost-effective way to get better results from your AI models. Overall, OpenAI's fine-tuning feature is an important development in the realm of AI and machine learning. It allows users to customize their model to make it better suited to their specific needs. It is important to note that it requires a significant amount of data and can be costly, but the potential benefits are worth it. If you're looking to
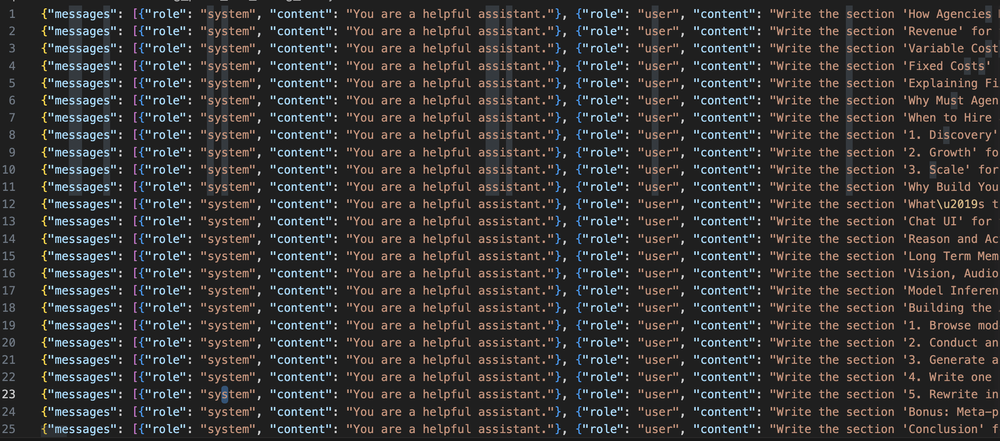
Alright, now we're going to learn about fine tuning. And as of recording this video, it literally just came out yesterday. So you're getting this fresh the API. For open AI 3.5 model. Is pretty straightforward actually. And they have some details. On the documentation and also the blog post, where they came out with fine tuning as well. I've just followed along with the example here, but I'm going to explain to you what's happening at each stage. The first thing you need to do is get your data into the right format. If you're following along here, you can make a copy of this. My data from my blog is here. And you can open that up. I'll show you what that looks like. This is the format. So it's called Jason L a, which is like Jason, except every object is on it's own line. So you can see there's no parent object. And it just is a list of messages. So the messages are the system message. I've just kept that default, but if you testing, fine tuning for yourself and you already have a prompt, that's working in the system message, you might want to. Use that prompt here. I've just gone with the default. And I think, it takes a lot of experimentation, but you might get better results if you update the system message equally I've just used this really simple prompt which is write the section and then the section headed for the blog posts and then the blog title. What I'd done is I split, I downloaded all 48 of my blood posts. I split them into sections based on the section headers, the H one tags. And then I've put the name of that section. Into into here. And then the. The blog. Title here. Like the AI is in responding. So obviously the AI didn't really respond this is what I'm telling you. It should have responded. So that's how you training it saying like when the user prompts like this. Then give me this type of content. And then my hope is going to train it to talk like me. So that's the actual section text. Yeah. So getting into this format is the first. A challenge. I actually like the. Probably the hardest thing. What I did actually is I cheated a little bit and I used code interpreter. I'll just show you how I did that. I uploaded the blog posts. And then I just asked it to prep it into this format and I gave it one example. I just said, prepping to write the section header for the bulk of this article title and make sure we cover all the blood place in the CSV format is like this. I give it one example. I just took a section header. Why most agencies charge so much for an old posts. And then I paste it in that text manually. Cool. It actually did all the work and I can include. I'll include the code that it used. So I asked it to actually, so one thing is initially it had a bunch of HTML in that, so I asked it to get rid of that. But other than that, it was, it worked really well. And I asked it to package up. All the code. So I'll include this as a. Dot Py file. So hopefully you should be able to just run this or you could give this to Coda temperature and say, can you do that for, but for. For my data. Cool. And then once you ask it to generate its output, you can click and save the file. Cool. So that's how you get the data in the right format. This is how you load my data. So if you just want to test, you can load this from this link. The it's just extracting the fall ID and then pulling the data and then saving it locally. And then this loads the data. So you can see you have 304 observations. Typically with fine-tuning what open AI says is you probably need at least 50 observations in order to start making, noticing a difference in the model. And I've seen in a few papers that it's typically around like 200.
Complete all of the exercises first to receive your certificate!
Share This Course